
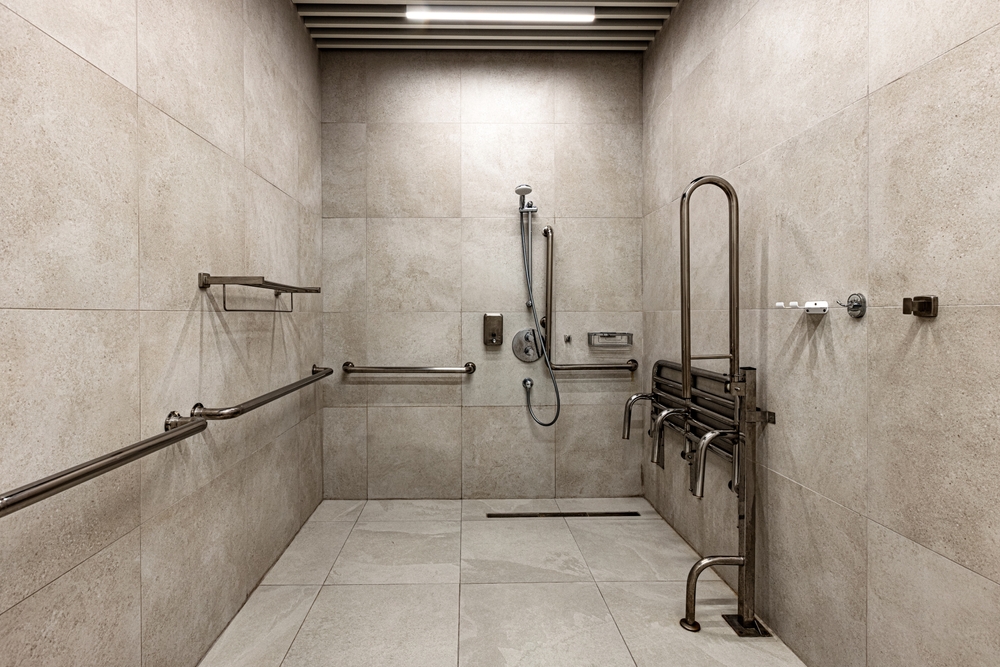
Where Should Grab Bars Be Placed in a Walk-In Shower?
Remodeling a bathroom involves many decisions, from picking out beautiful tile patterns to selecting the right shower head. However, the most critical choices center on stability, ease of use, and long-term protection. Adding safety supports is one of the smartest upgrades you can make during a bathroom renovation. If you are designing a modern, accessible bathroom, knowing exactly where to position these bars will make your daily routine much more comfortable.
Many homeowners worry that adding safety features will make their bathroom look like a medical facility. The reality is that modern safety fixtures come in gorgeous finishes like brushed nickel, matte black, and polished chrome, blending right into a sleek design.
At One Day Bath Inc®, we help homeowners merge style with function to build spaces that look incredible and function beautifully for all generations.
The Three Critical Zones for Safety Bars
A walk-in shower requires stability at three specific moments: entering the stall, standing during the wash, and moving near the seat or controls. To maximize protection, your installation layout should address each zone individually.
1. The Entry and Exit
The threshold is where many slips happen because you are transitioning from a dry floor to a wet, slick surface. A vertical bar placed right at the entrance jamb provides a solid handhold as you step over the low curb.
This fixture should be installed on the wall opposite the door hinge or directly on the outer edge of the plumbing wall. Placing it here allows you to keep one foot firmly on the dry floor outside while stabilizing your upper body as you step into the wet zone.
2. The Back Wall or Sidewall
Once you are inside, you need a continuous support option while washing your hair or standing under the water stream. The long back wall of the shower stall is the perfect location for a horizontal or angled bar.
If you are currently planning a walk-in shower in West Chester, PA, prioritizing these subtle stability layouts on the main wall from the very beginning will help keep your independence intact for years to come. A horizontal bar spanning this wall gives you a steady grip to hold onto if you lose your balance. Alternatively, an angled bar can accommodate family members of varying heights, as the grip point slopes naturally up and down.
3. The Controls and Seating
You never want to stretch or lean awkwardly to turn on the water or adjust the temperature. Placing a vertical or small horizontal bar right next to the faucet protects you from slipping while dialing in your preferred water temperature. If your design includes a built-in bench or a fold-down seat, a horizontal bar must be fixed on the adjacent wall to assist you when sitting down or pushing yourself back up to a standing position.
Recommended Height and Sizing Guidelines
For residential installations, the Americans with Disabilities Act (ADA) guidelines serve as an excellent blueprint, though residential setups can be customized to match your specific height. This degree of personalization is standard during a professional shower replacement in King of Prussia, PA, where fixtures are aligned to the exact physical proportions of the primary users.
The standard rule of thumb is to place horizontal bars between 33 and 36 inches above the finished shower floor. This range lines up beautifully with the average person’s waistline, allowing for a natural grip that does not require you to reach too high or bend too low.
To keep your configuration clear, use this quick reference table for sizing and location targets during your planning phase:
| Placement Zone | Bar Orientation | Standard Height Range | Primary Function |
| Shower Entry | Vertical | 40 to 60 inches from floor | Stabilizes the initial step into the stall |
| Back Wall | Horizontal or Angled | 33 to 36 inches from floor | Offers standing balance during washing |
| Faucet Controls | Vertical | Centered next to the valve | Prevents slips while reaching for water dials |
| Shower Bench | Horizontal | 6 to 9 inches above the seat | Assists with sitting and standing transitions |
Key Rules for a Solid Installation
Simply screwing a metal bar into a piece of drywall or an acrylic wall liner will not provide real protection. If someone falls, the force exerted on the fixture can pull it right out of the wall, causing serious injury.
- Anchor to Solid Wood Blocking: Safety bars must be anchored directly into the structural wooden wall studs or 2×6 wood blocking installed behind the shower walls.
- Verify Weight Capacities: High-quality bars are designed to support up to 250 to 500 pounds when anchored properly.
- Select a Textured Grip: Smooth, polished chrome bars can become incredibly slick when covered in soapy water. Opt for a peened, textured, or knurled finish to provide a secure grip even when your hands are wet.
- Check the Clearance Gap: Standard guidelines dictate that there should be exactly 1.5 inches of space between the wall and the grab bar. This leaves plenty of room for your fingers to wrap completely around the metal without creating a trap where your forearm could get stuck.
Why Professional Installation Matters
While adding a screw-in handle sounds like a simple weekend DIY project, remodeling wet spaces is highly complex. Thorough planning requires specialized tools to cut into acrylic panels, fiberglass, or porcelain tile without cracking the waterproof surround. You also need to fully waterproof the mounting brackets to protect against hidden mold growth and structural rot behind your beautiful new walls.
When you trust your bathroom project to the experienced team at One Day Bath Inc®, we handle the behind-the-scenes work. We make sure the heavy structural wood blocking is anchored firmly in place before the waterproof walls go up, giving your hardware a rock-solid foundation.
Build a Bathroom That Grows With You
Planning for accessibility does not mean sacrificing your personal style. By carefully mapping out your layout, you can build a stunning oasis that supports your independence for decades to come.
If you are ready to update your space with a custom walk-in design, the design specialists at One Day Bath Inc® are ready to help. We walk you through every step of the design process, from custom layouts to gorgeous finish options. Contact us today to schedule your consultation and see how easy it is to upgrade your home.